
We love cushions: on the couch, on the bed or on the boat. To us they are synonym for comfort and style simultaniously. A cushion is a great place to start when you are venturing out for the first time into the mind boggling lands of crafting.
The great thing about the rectangular (or square) ones is that they are simple to make, yet can still be a great project to make you feel accomplished. And we also do have to admit that we haven’t found our love for round ones so far, maybe it will still come one day…
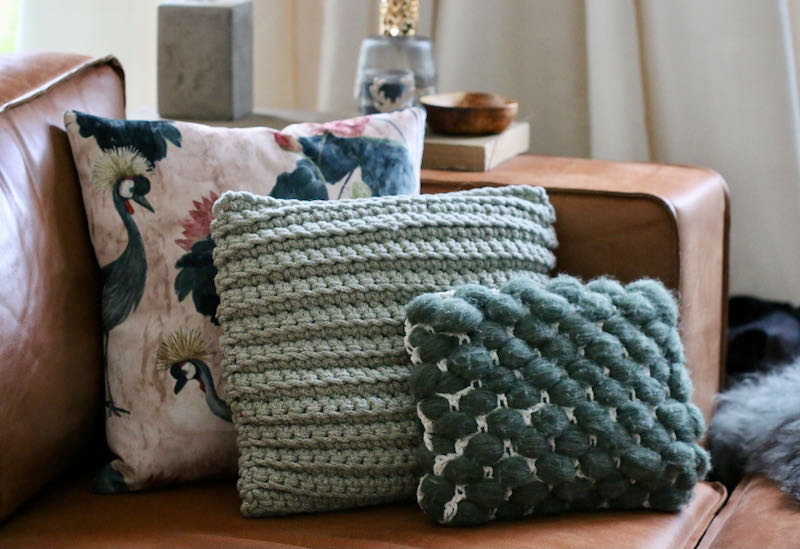
We like to mix it up for a visually more pleasing result. Different colours, materials and styles. So today we have a lovely little trio consisting of a store bought one, a crocheted one and a crocheted/woven one.
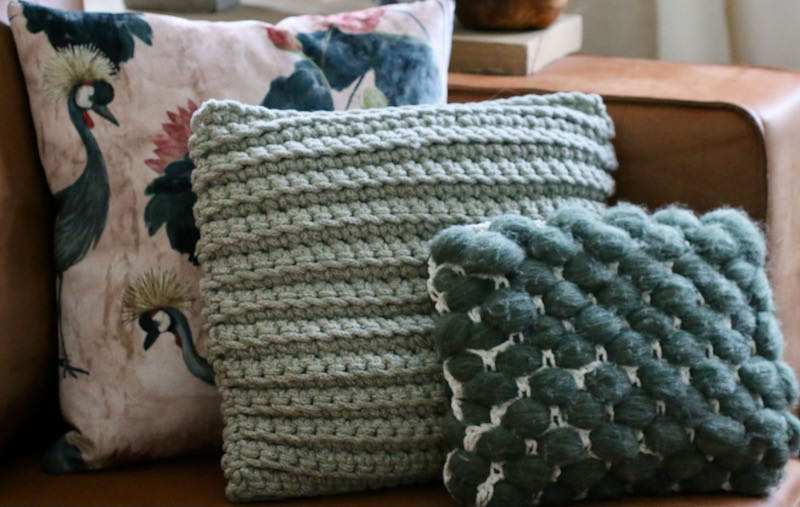
The velvet fabric cushion (1st from the left) has a rich pattern and is made of a luxurious textile. It is soft and squishy but has a firm core. We used the colours as a basis for the other two cushions. We chose for a light and dark green as the velvet one has quite a high amount of pinks already present.
The light green cushion (2nd form the left) has a crochet front and a fabric back. We first crocheted the front panel and then sew on the back. The cushion is filled with left-over fabric scraps. The back is made of left over silk we already had in a matching light green color.
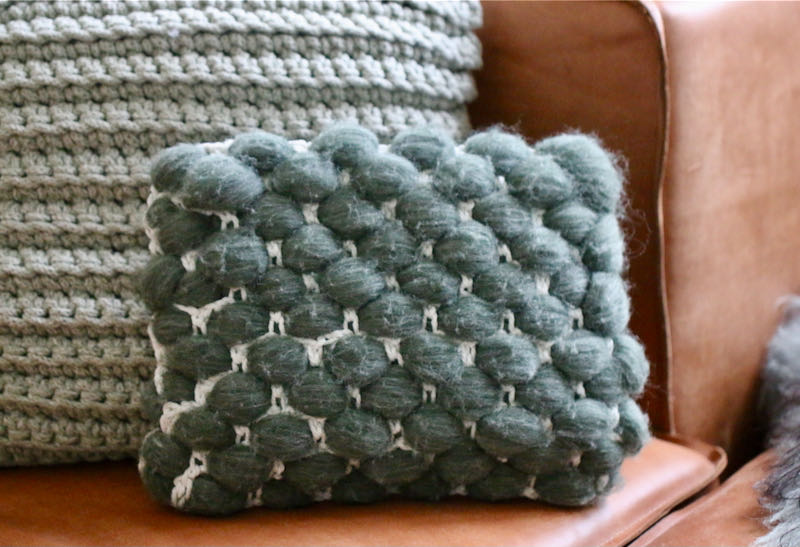
The dark green cushion (3rd from the left) is a mix between a crochet and weave technique. It gives the little sturdy cushion a great 3 dimensional look. With this one we also first did the front panel and then sew on the back. The back is made of a left over 100% organic cotton we already had in a matching dark green color.
How did we make the two smaller cushions?
The light green one we made using the crochet ribbing stitch (using single crochets). In this video you can learn the stitch. You can start at 5:27, if you don’t want to see the other stitches. For our cushion we cast on 25 and crocheted 27 rows. We had the front panel ready in less than an 1 hour, so this is fairly quick. Sewing on the backing (optional) & back and making the filling took us about 1 hour as well.
The dark green one is a bit more laborious as you will need to weave in the merino roving/xxl chunky yarn into the crochet ‘mesh’ and then sew on the back. In this video you can learn the stitch. For our cushion we alternated the open parts to create a brick-layer effect. Once the mesh was ready we ‘wove in’ the chunky merino wool carefully. We worked with 8 open parts across and 11 vertically. Keep in mind that you need to have ‘a frame’ around the mesh of 2-3 regular single crochets. You need this for sewing on the backing.
For the back you will need to first create a backing, sew on the front panel and only then can you proceed with the actual back and fill the cushion. We do advise to use the same color of backing as the wool. You will be seeing it through the open stitches. Or you could use for a more playful effect a contrasting colour. For our project we opted for a calm look and chose a dark green backing.
Here are the exact things we used:
- Store bought cushion: from the young and lovely Dutch label Claudi
- Light green cushion: backing and back made of raw silk, front made of an 8mm cotton macramé yarn, filling: fabric scraps
- Dark green cushion: backing and back made of organic cotton fabric, front made of a 5mm cotton macramé yarn and roving/xxl chunky merino yarn, filling: recycled cushion filling
- Accessories in the photos: olive wood bowl from Finca Forata, Lampe Berger and Fabulously Dutch made votive candle holder, wooden couch arm plateau and cement bulb lamp